
Still have more Questions?
Call (855) 505-6789
Save virtually 100% on processing fees through a unique program developed to help merchants nationwide by offering their customers a discount for paying with Cash or in store gift cards.
Just about any business that accepts credit cards can benefit from our advancements. From professionals like doctors, lawyers, dentists and accountants and auto repair shops and daycare centers to retail establishments, 1ST Merchant can put more money in your pocket every month — a lot of it! Depending on your utilization of the technology to process payments and traffic in and out flow.
This is the fun part. We’ll send you everything you need in one handy package. You’ll receive a payment terminal, along with signage for your front door and terminal area explaining the discount for cash-paying customers. You’ll also receive free training, as will your sales staff.
It’s easy! Just Click Here and fill out a simple form. It only takes a couple of minutes! Business and Personal information, it’s confidential and secure. Welcome to the 1ST Merchant family of smart merchants who are saving money every day!
Customers understand the high costs of processing payments and opt in or use cash. 1ST merchants, Merchants love this program and there has been virtually no negative impact from their customers.
1ST Merchants 0% Processing fees program is new, yet a lot of merchants are already using the 1ST Merchants Proprietary software and enrolled into the program, and more are signing on every day.
As stated in the Durbin Amendment §124.STAT.2073, 9b2, 15 U.S.C. § 1693o-2, businesses are permitted to offer a discount to customers as an incentive and to encourage customers to pay by alternative methods other than a credit/debit card including either checks or cash in order to automatically receive a discount which is applied at the time of sale.
To manually settle your batch, do the following:
- Press the “Function” Key
- Select Option 2 (Batch)
- Select Option 1 (Batch Close)
To reprint a receipt in the batch follow these instructions.
– When on the Main Menu, you press Function ( FUNC)
– Scroll down until you see “Reprint” and select that.
This will give you option to reprint last receipt or any receipt in batch.
To reprint other receipt in batch, you will press “Any Receipt”. Select Credit. And type in the transaction number of whichever transaction you needed receipt of and it will print out.
If there is a download available for the terminal and there are no transactions in the terminal then you can simply do a power cycle. Turn the terminal off followed by turning it back on or disconnecting the power and reconnecting it will work as well. The terminal will look for updates and then automatically download any that are available onto the terminal. If the terminal doesn’t automatically do the update you can go into the APP UPDATE section and manually update the terminal. Press the MENU key, then select SYSTEM SETTINGS and then select APP MANAGEMENT. The terminal will prompt you to enter in the password which will then allow you to select APP UPDATE. The terminal will now connect and download any updates in the system. Once downloaded the terminal will reboot followed by returning to the main sales screen.
The Pax S80 terminal holds 1500 transactions. You will have to either batch out or clear the transaction once it reaches 1500.
Its very easy to add tip. Start with FUNC button.
Press Tip Menu (key 6)
Choose “by Trans” (key 4)
Enter Transaction numer, then press enter.
Double check the credit card number, press enter to confirm.
Input the tip and press ENTER key (3 times to complete)
To change from IP or Dial, follow these steps:
– Press Menu button
– Select Communications
– Select Main Communications
– Select either LAN or Dial
The password is the current date in form HHDDYYYY
For example, if today is October 22nd, 2020 then password is 10222020
To set up auto-batch/autodial or adjust the time for the batch to be settled follow these steps:
Press Menu Button
Press 4 for Host Settings
Enter Password
Press 5 for Autodial Setup
Make sure it says 2
Click 2 for On
Enter Start Autodial/Auto-batch time
Press Enter
Enter Stop Autodial/Auto-batch time
Enter 15 for AD Intervals
If successful, it will bring you back to Host Settings.
Power down the terminal and then power it back up again. The terminal will then just reboot and clear the unsuccessful tries and you’re able to try the password again.
Clover’s App Market ![]() enables you to customize Clover to fit the needs of your business, employees, and customers.
enables you to customize Clover to fit the needs of your business, employees, and customers.
In the App Market ![]() , you’ll find free and paid apps created by Clover and third-party companies.
, you’ll find free and paid apps created by Clover and third-party companies.
Common Questions
Do I need to create a special Clover account to use the App Market?
You don’t need to create a special Clover account to use the App Market. Just log in to your Clover account using the instructions above.
Can I install apps from the App Market onto my phone or tablet?
You can’t install apps from the App Market ![]() onto non-Clover devices such as an iPhone, iPad, or an Android device.
onto non-Clover devices such as an iPhone, iPad, or an Android device.
Purchasing an app
How am I billed for my subscriptions on the App Market?
Your merchant account is billed for any app subscriptions or metered billing for apps you have subscribed to. No credit card or other form of billing available.
How do I pay for paid apps?
Paid apps are paid through your connected merchant account.
If I have more than one Clover device on my Clover account, do I need to purchase an app for each device?
No, you don’t have to purchase an app for each device on your Clover account. Once you purchase an app, it will be installed on all of your applicable Clover devices.
I purchased a new Clover device. Do I need to copy my apps onto it?
When you activate your new Clover device, the apps associated with your Clover account will automatically be installed onto your new device.
Third-party apps
What is a third-party app?
The App Market ![]() offers apps created by Clover, Inc., and it also offers apps created by other companies (known as third-parties).
offers apps created by Clover, Inc., and it also offers apps created by other companies (known as third-parties).
This is similar to Apple’s app store, where some of the apps were created by Apple, and other apps were created by other companies.
How can I tell if an app is a Clover app or a third-party app?
In the App Market ![]() , you’ll see the apps that are installed on your Clover devices and other apps that are available to be installed. Below each app name is the name of the company that created the app as well as the cost of the app (if any).
, you’ll see the apps that are installed on your Clover devices and other apps that are available to be installed. Below each app name is the name of the company that created the app as well as the cost of the app (if any).
Is Clover responsible for third-party apps?
The company that created the app is responsible for supporting it, not Clover, Inc. Please contact the company that created the app if you have a question. Go to the App Market on the web or a Clover device, and tap the app name to find contact information for that company.
How do I install or uninstall an app?
See the article Install / Uninstall Apps For Your Clover Devices.
How do I see a list of all of the apps that are available for my Clover devices?
Open the App Market ![]() on a Clover device, or go to the App Market on the web.
on a Clover device, or go to the App Market on the web.
Free Apps and 30-day Free Trials
How do I cancel my subscription for an app?
When you uninstall the app, your subscription will be canceled.
Do I need to register a credit card to install an app with a 30-day free trial?
No, but your merchant account will be billed after the 30-day free trial ends if it is still installed.
If I sign up for an app with a 30-day free trial, will I receive a warning that my merchant account will be charged?
Yes, you will receive a reminder email just before the 30-day free trial ends.
Why are some apps free and some paid?
Some of the apps in the App Market ![]() are free, and others require payment. When Clover or a third-party company offers an app that takes more time for initial development and updates, they may decide to charge a monthly subscription.
are free, and others require payment. When Clover or a third-party company offers an app that takes more time for initial development and updates, they may decide to charge a monthly subscription.
If an app is free now, can the company charge me for it later without my approval?
Companies can’t charge your merchant account on file without your approval. When you click to subscribe & install an app, you are agreeing to the charge terms that are listed.
Payment Confirmation
How do I see a list of apps I’ve been billed for?
- On the Web Dashboard, open the App Market
 app.
app. - Click Billing History in the top right corner of the page.
You’ll see a list of the apps you’ve been billed for.
Will I receive confirmation each month that I’ve been billed?
You will receive a separate confirmation email for each charge and each app.
Subscriptions, Installing, and Uninstalling Apps
If I uninstall a paid app, will I still be billed for the remainder of that subscription month?
Yes, if you uninstall a paid app, you’ll still be billed for the remainder of that subscription month.
Am I charged for apps on a calendar month basis?
The monthly billing cycle starts on the date you installed the app, and you are billed every subsequent month until you uninstall the app.
What happens when I upgrade to a higher tier within a paid app?
If you upgrade to a higher tier within a paid app, you will be charged a prorated amount for the remainder of the current billing month.
What happens when I downgrade to a lower tier within a paid app?
You will be moved to the lower tier functionality immediately, and you will be charged the new amount for the lower tier starting on the next billing cycle.
What happens when an app changes subscription pricing?
If you subscribe to an app at a specific rate, that rate continues until you uninstall the app, the app becomes unavailable, or the company that created the app removes it from the App Market ![]() .
.
If a company changes the subscription rate for an app, the new rate only affects new installations. Therefore, if you uninstall and want to reinstall an app, you will see the current price for that app, which may be higher than your previous subscription rate.
NOTE
Uninstalling and reinstalling apps may cause you to be double-billed or bumped to a higher subscription rate if you reinstall the app. Before uninstalling the app and reinstalling the app, check the troubleshooting section for the app and contact the company that created the app.
What happens if I uninstall, then reinstall, an app in the same day because I’m having issues with the app? Will I get charged twice?
If it’s during the 30 day free trial, you will not be charged. If it’s after the 30 day free trial, uninstalling the app will end your previous subscription, and reinstalling the app will start a new subscription.
IMPORTANT
Most issues with apps are not fixed by uninstalling and reinstalling the app. Uninstalling and reinstalling an app to troubleshoot issues is strongly discouraged because it may increase your subscription fee, and it typically does not fix the problem. For any app issues, contact the company that created it. You can find their information in the App Market by clicking the app name.
I haven’t used the app since I downloaded it. Do I still have to pay for it?
Yes, your subscription begins when you install the app.
If your app has a 30-day free trial, you can uninstall the app any time prior to the start of the paid subscription period and you will not be charged for that app subscription.
Refunds
How do I request a refund for an app?
- If the app is on a Clover device or your Web Dashboard, first uninstall the app.
- Contact the company that created the app regarding your refund request.
You can find the company’s contact information in the App Market on the web or a Clover device.
How do I request a refund for an app that I do not remember installing?
- If the app is on a Clover device or your Web Dashboard, first uninstall the app.
- Contact the company that created the app regarding your refund request.
You can find the company’s contact information in the App Market on the web or a Clover device.
Who do I contact regarding a billing error?
Contact the company that created the app. You can find the company’s contact information in the App Market on the web or a Clover device.
An app I paid for is not working. What should I do?
Check the troubleshooting section for the app and contact the company that created the app. You can find the company’s contact information in the App Market on the web or a Clover device.
Reference Site: https://help.clover.com/faq/app-market/
Yes, you can change the order of items within a category and the order that your categories appear in the Inventory app![]() and the Register app
and the Register app![]() . See Rearrange and search for categories for instructions.
. See Rearrange and search for categories for instructions.
How do I charge the battery in the card reader? #
Card Reader can be charged using the micro USB cable provided via a laptop USB port, a portable charger or a wall charger (not included).
Does the reader charge when plugged into the audio jack?
Only if you also have the charger connected to a wall charger, portable charger, or some other power source.
What are the minimum rating requirements for the reader’s battery to charge?
The reader needs to be charged by a PSU similar to mobile phone charger with minimum rating of 5V, 1000mA.
Can I swipe transactions if the reader’s battery is not charged?
No. Both swipe and EMV transactions require that the battery be charged.
How long does it take to charge the battery? #
Time to fully charge the battery is approximately 2.35 hours with 10W PSU (USB).
Can I use the reader to process transactions while it is charging? #
Yes, the reader can be used while the reader is being charged via USB.
How quickly can I use the reader if I start charging it after it is drained? #
With a fully drained battery and 10 minutes of charge, you should be able to perform approximately 5 transactions.
If I am not using the card reader, will it still lose charge? #
Yes. When the rechargeable battery is fully charged, it takes about 3 months to lose charge when kept without being used.
How can I tell what the status of the battery is? #
The reader needs to be connected to a phone/tablet or a power source in order for the LED lights to come on indicating battery status.
How can I tell how much battery charge remains?
Battery Life indicator within the Settings drawer can be used to see how much charge is left. Reader must be inserted into the audio jack of your device and app must be open in order to see that information.
How many transactions can I process on a full charge? #
Current testing shows that user can process approximately 100 EMV transactions or 200 swipe transactions on a full charge over a period of time. However, if processed within a single day, that number may be higher.
I inserted my reader into the audio jack of my device but the LED lights are not coming up and I know I just charged the reader. What should I do? #
Make sure the app is allowed access to the microphone. You can check that within the Settings of your phone or tablet. Next, make sure the volume limit is set to the maximum level and is not on mute. Also, make sure you are not talking on the phone or using a Bluetooth device (like speakers) that diverts away from the audio jack. If that still does not work, access the Settings Drawer of your app, go to the Help and Support section and call the Customer Service number you see there for assistance. NOTE: Some cases and covers interfere with the reader fitting correctly. Remove your case or cover and see if that helps.
Can I use a card reader other than the Clover Go card reader?
No. Each processor’s reader is encrypted for their use only.
Can I buy the Clover Go card reader on the Internet? #
No. The Clover Go card reader must be purchased through First Data so that it is embedded with the appropriate encryption. That encryption can’t be obtained elsewhere.
Can I use my Mobile Pay reader? #
No. You must have a Clover Go reader.
What are the minimum OS requirements for Clover Go?
iOS version 8.2 and higher (oldest model supported is the 4S)
Android version 4.4 and higher
Windows Phones are not supported at this time
IMPORTANT
Clover Go will not function on a jailbroken or rooted device
What devices is Clover Go compatible with?
Yes, Clover Go works with Apple and Android phones and tablets.
Is there a separate app for tablets?
No, both tablets and phones currently use the same app
Do I need to purchase a specific device in order to use Clover Go?
You can use your own phone or tablet.
Do I need to use a specific phone carrier?
No, you can use the carrier of your choice.
Will Clover Go work on a rooted or jailbroken device?
Security is a top priority. For this reason Clover Go will not work on a rooted or jailbroken device.
Does Clover Go work over Wi-Fi and Cellular Network?
Yes, Clover Go works over both Wi-Fi and Cellular Network.
Does Clover Go work when there is no connectivity?
No, connectivity is required to use Clover Go.
If I delete and reinstall my Clover Go app, will I lose all of my in-app data?
No, your data is stored on clover.com, so you will not lose all of your in-app data if you have to delete and reinstall the Clover Go app.
How much data is used for a transaction?
Data usage may vary, but it’s approximately 25 kilobytes per transaction for a swiped transaction.
How do I batch out my transactions for the day?
Clover Go utilizes an auto-batch function to close the batch for the day. The auto-close time is systemically set for 1:00 AM EST unless otherwise specified at or after boarding. For more information on the close time set for your specific account, please contact your Business Consultant or call the toll free support number provided (in the App: Tap the icon in the upper left to open the Menu drawer. Then, tap “Help and Support” or in Web Dashboard: in the Support box in the upper right corner of the screen).
How do I login to my Web Dashboard?
Go to www.clover.com and click “Log in” at the top right hand side of the page. Your login credentials are the same email address and password that you used to activate your Clover Go app.
Why do I only have Quick Mode? Where is my inventory?
It means that your merchant account was set up under the Terminal Service Plan. Clover Go requires the Register Service Plan in order for the inventory features to function. You can upgrade via the Clover Dashboard by:
- Opening App Market , tapping the top left menu button, then tapping Service Plan
- Contacting your Business Consultant or calling the toll free support number provided (in the App: Tap the icon in the upper left to open the Menu drawer. Then, tap “Help and Support” or in Web Dashboard: in the Support box in the upper right corner of the screen)
NOTE
A fee may apply if you have other Clover devices.
I received an error message telling me to upgrade to the Pro Service Plan. What does that mean?
It means that your merchant account was set up under the 2000 Service Plan. Clover Go requires the Pro Service Plan in order for the in-app features to function. You can upgrade via the Clover Dashboard by selecting App Market, then Service Plan, by contacting your BC or calling the toll free support number provided.
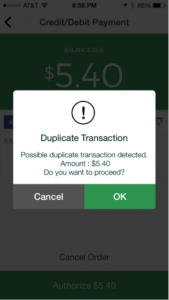
I am getting a Duplicate Transaction message. What does this mean?
The last four numbers of the card and dollar amount of this transaction is the same as a recently completed transaction. You can continue with the transaction; this is just a warning to help avoid charging the same card twice by accident. You can open the settings drawer and tap Transactions to review the completed transaction prior to proceeding with the current one, if desired.
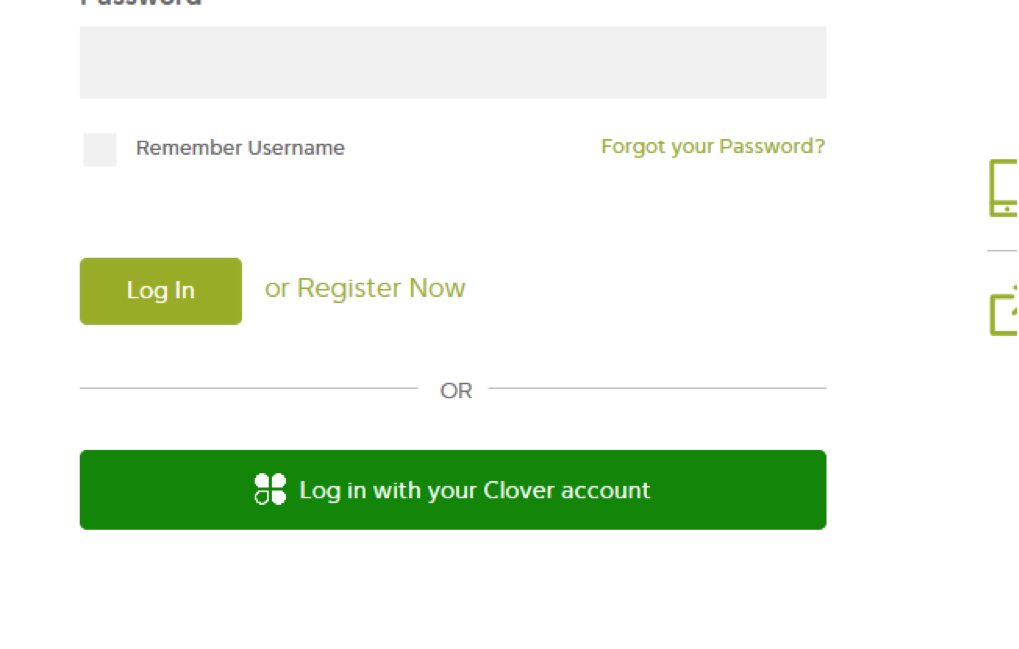
How do I log in to Clover Insights?
Either click on the link in the welcome email or go to https://getinsightics.com/login. Choose “Log in with your Clover account” and use the same login credentials you use to log into the Clover Web Dashboard and/or your app.
When I submit a transaction I am getting an error: “Error occurred – You are not authorized to submit transactions from your current location, which is outside of the United States or its Territories.” Why am I getting this error?
Clover Go is intended for use within the United States. This error is presented when a transaction is being initiated outside the United States.
I had my app open and now it is asking for my PIN again? Why is this happening?
This means that your session expired due to time or inactivity. After an hour of inactivity the app will log the user out and require them to use their PIN to log back in.
How do I see which version of the app I have?
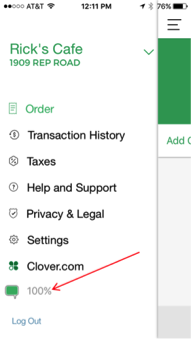
Tap the icon in the upper left to open the Menu drawer. Then, tap “Help and Support” and then tap “About”.
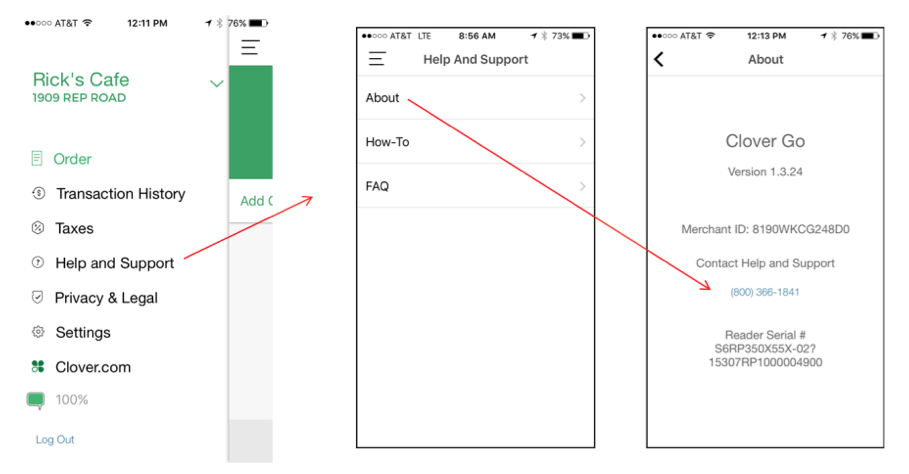
Where can I find the phone number to call if I need help or have a question?
Tap the icon in the upper left to open the Menu drawer. Then, tap “Help and Support” and then, tap “About”. You can also find the number on your Web Dashboard.
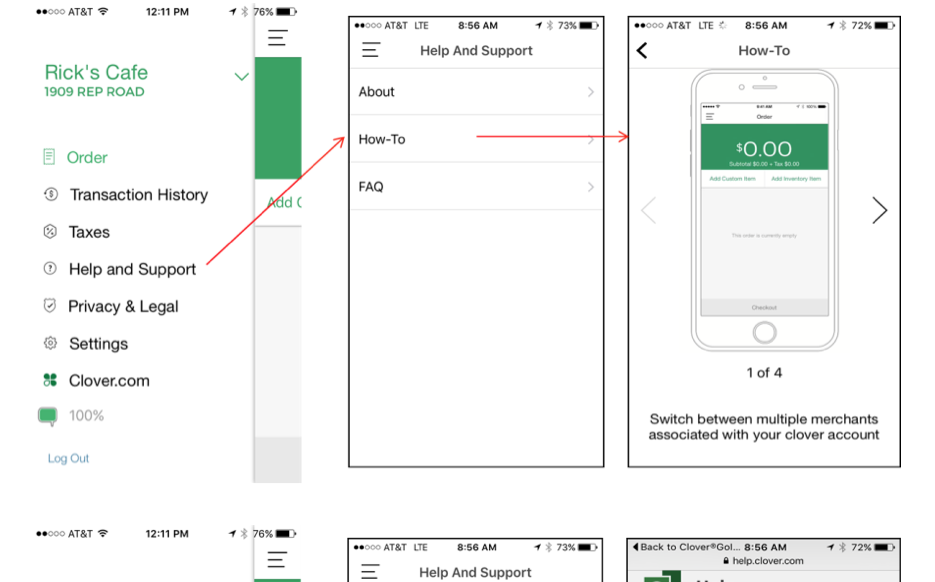
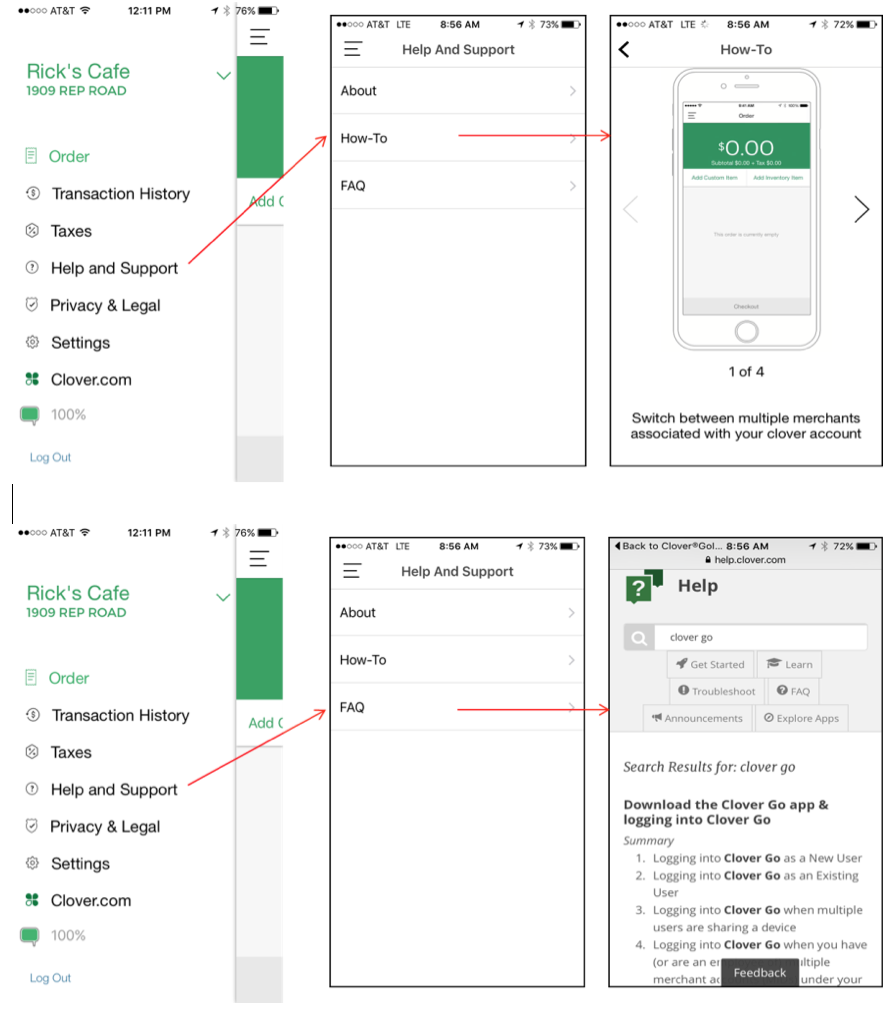
Is there anything in the app that will show me how to use the app?
You can access How-To videos and the FAQ from “Help and Support” in the Settings drawer.
Reference Site: https://help.clover.com/faq/clover-go-help-and-support-faqs/
How can I enable Tips within the app? #
Login to your Web Dashboard at www.clover.com and select the Setup app, you will then see Tips as an option on the left hand side. Click that and you will be able to control whether or not the Tip screen presents by checking or unchecking the “ask for tip” box. You can also configure what percentages are displayed as options.
NOTE
Tip Label will not carry through to the Clover Go app.
How can I disable Tips for the app? #
Login to your Web Dashboard at www.clover.com and select the Setup app. Click the Tips option on the left hand side and uncheck the “Ask for tip” box.
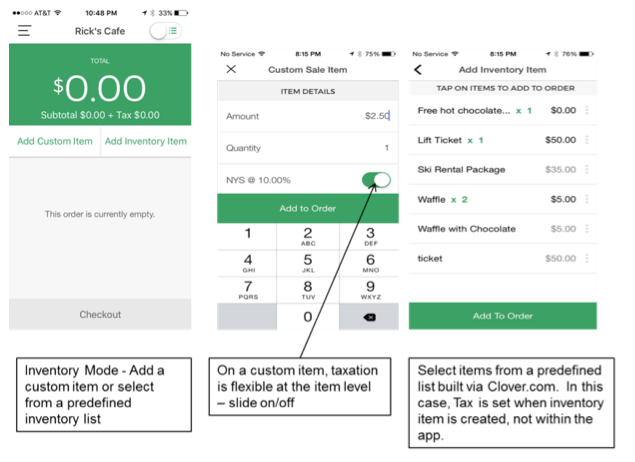
I selected the tax rate I want to apply, but it is not applying to my inventory items. Why? #
The tax rate selected via the Settings Drawer is only applied to custom items. For inventory items, the tax rate set when creating the item will be applied.
How do I add a tip to a transaction?
Ensure tips are enabled in your Web Dashboard. Once your tips are enabled, upon payment type selection of “Credit/Debit Card” the tip screen will appear before you “Authorize” the transaction.
Can I add a tip after completing the transaction?
No. Clover Go does not support tip adjustment.
I added inventory (or made changes) within my Web Dashboard but do not see those changes reflected in the app…what did I do wrong?
Go to Settings > logout. Then log back in with your PIN. Inventory app will be refreshed when you log back in to the app.
Do you support Inventory Management? #
At this time, we do not increment or decrement quantities based on purchases or refunds. Inventory that has been set up on the Clover Dashboard will present in the Clover Go app to simplify order entry.
Can I add items to the inventory from within the app?
Currently you cannot.
Why do I not see a tax rate that I can include as part of my Quick Mode item?
Quick Mode does not support the application of taxes as a separate line item. The full amount should be included in the total entered.
Am I able to add a custom header and footer to my receipts?
Yes, open the Setup app and click on “Payment Receipts”.
Reference Site: https://help.clover.com/faq/clover-go-inventory-and-setup-faqs/
I have multiple accounts and switched to the one I want to process for. Will this be the account I continue to process for until I change it? #
No, your default processing account will be your Primary Merchant Account. If you change it, the change will be applicable for the duration of the session. When you log out (or your session times out), it will revert back to your Primary Merchant Account.
What is a Primary Merchant Account?
If a user is assigned to multiple accounts, there may be a unique PIN for each. In order not to require that a user remember multiple PINs, we will assign the user a “Primary Merchant Account”, which will be the Merchant ID whose PIN will allow entry into the app. Once in the app, the user can easily switch between any of the accounts assigned to them under the same email address with this one login.
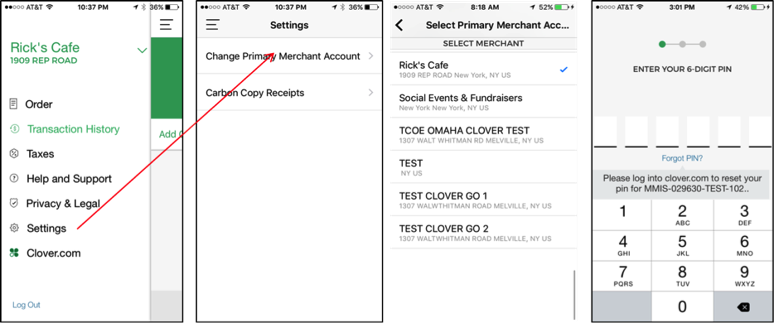
Am I able to change the Primary Merchant Account?
Yes, you can change the Primary Merchant Account from the settings on the Clover Go app at any time. When Primary Merchant Account is changed, the PIN assigned to that account in www.clover.com is now the PIN used to log in to the app.
 #
#
I have multiple accounts, but they are under different email addresses. Will I be able to switch between them in the app? #
No. You have to log in separately for each account that is under a different email address. Only accounts under the same email address are tied together by a single login.
I have 5 merchant accounts. Why do I only see 4 of them when I tap the merchant name in my Settings drawer?
First, try logging out and logging in as a new user. Input your existing credentials (email address and password) and see if the list of available accounts refreshes to include the missing account. If that does not work, check the service plan of the account that you do not see to make sure it was set up as the Pro Service Type. If not, you can contact Customer Support at the toll free support number provided when you log in to the app then tap “Help and Support” and then, tap “About”.
How can I allow my sales team to take payments on my behalf? Can I add them as users on my account?
You could create more users by logging in to your Web Dashboard at www.clover.com. Create a new employee by clicking on Employees app and filling in required fields of Full Name (can be first name only) and Email Address.All other fields are optional. Select the appropriate role (Admin, Manager, Employee) for your employee. Once you finish creating a new employee in Employees app, each employee added will receive an email from Clover with a link to verify their email and ask them to create a password. Your employee will need to create a new password before they can access the Clover Go app. Also, they would need to first download the Clover Go app and have a Clover Go card reader to be fully functional.
When setting up my Employees, what is the difference in functionality within the Clover Go app for the 3 available roles and can I assign a custom role?
An Employee assigned an “Admin” role will be able to see transactions executed by all users, perform refunds on any transaction, and perform administrative functions such as setting up carbon copy receipts. An Employee assigned the role of “Employee” will be able to access only their own transactions but will not be able to perform refunds on any of their own transaction. An Employee assigned the role of “Manager” will be able to access only their own transaction and will be able to perform refunds against their own transaction. Clover Go does not support any custom roles at this time.
How can I order additional card readers to provide to my employees?
Contact your Business Consultant or access the Settings Drawer of your app, go to the Help and Support section and call the Customer Service number you see there for assistance.
Am I limited to the number of Employees that I can add under a single account?
No, we do not restrict the number of employees that you can add to your account.
Can any of my employees add other employees to my account?
Only those employees that you create as Admin employees will be able to add other employees to your account, if you grant them that right.
Am I able to change my PIN or that of my employees?
Yes, you can do that any time via your Web Dashboard at www.clover.com. Access the Employee app; find the employee whose PIN you want to change and click the pencil icon to the right of their name to edit.
Can my employees issue refunds?
Yes, but only if you give them the permissions to do so. An employee assigned a “Manager” role will have the ability to issue refunds on their own transactions but cannot issue refunds for other employees. An employee assigned to an “Employee” role cannot issue refunds, not even for their own transactions. But, an employee assigned to an “Admin” role, can see all transactions and refund any transaction executed by any Employee under the account.
I do not want my employees to be able to select check and/or cash as an option. Can I suppress that?
Yes. As an Admin, you can go to their Web Dashboard at ww.clover.com, click Setup app, click “Payments” and select or deselect “check” and “cash” as tender types.
Note: Not all tender types apply to Clover Go-only users at this time.
I created a new role and changed assignments for my employees. However, these updates are not working with my Clover Go app.
We are working to build out role based functionality for Clover Go and at this time the Clover Go app does not support custom roles or permissions.
Reference Site: https://help.clover.com/faq/clover-go-multiple-users-or-accounts-faq/
I am in Quick Mode and added a dollar amount. Now I want to switch to Inventory Mode and select a few items from my list, but the toggle is greyed out. Why is that?
Inventory mode and Quick Mode are mutually exclusive. You cannot have a mix of the 2 in the same order. If you need to add an ad-hoc item while in Inventory mode, you can do so by adding a Custom Item. Once you start your order in one mode, the toggle will be greyed out and not “switchable” to the other until the order is complete or cleared.
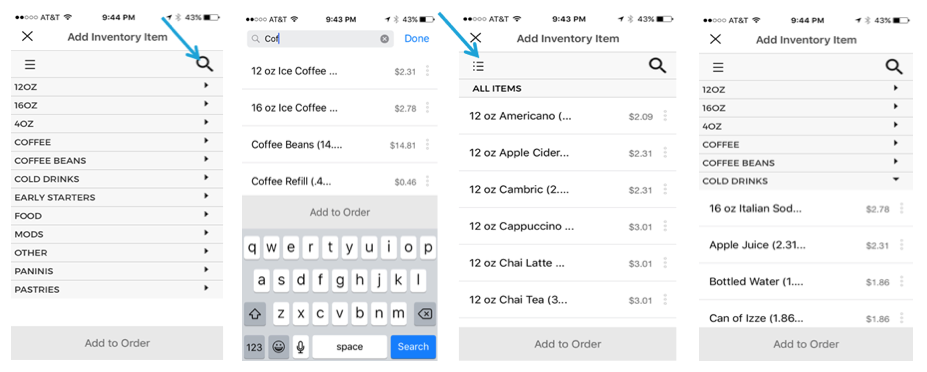
How do I add Inventory items to an order?
Tap on either Add Custom Item (if not in your inventory) or Add Inventory Item. Then either create a custom item or tap on the inventory items you want to add. Quantities for an inventory item can be changed by tapping the three dots to the right of the price. Then tap Add to Order.
I added an item to inventory and set it up with a variable price. However, I do not see that item when I pull up inventory within the app.
The app currently does not support variable priced or per unit priced items. You will need to change it to Fixed price in order to see and select it within the Clover Go app.
I have a huge inventory, how can I quickly find the item(s) I want to select?
You can either use the search function by tapping the magnifying glass icon and then typing in your search OR You can switch to categories mode by tapping the three bar icon.
NOTE
Categories can be assigned to an item in the Inventory App on the Web Dashboard.
When I enter a manual transaction and need to clear the contents I can clear the expiration date, but why is the card number is not clearing when I tap the back button?
Because the card number is a separate field, you need to tap on the card number field before you can clear the card number.
I tapped the credit card number, but now I want to go back and change the expiration date. How do I do that?
You have to delete 1 character of the card number then add it back in and it will take you to the next field.
I was entering my credit card number manually but the app did not let me enter the complete number. After a certain digit, it jumped to the expiration date field. What do I do?
There are some cases where this can happen. To correct, please tap on the card number field and it will allow you to go back and complete entering the digits. In rare cases where it does not, the card reader should be used, if possible.
I manually entered the card number, why do the digits display in red?
This is an indication that the card number entered may not be valid. Please go back and re-enter the number to ensure that all digits were entered correctly.
I manually entered the card number, why do the digits display in red?
This is an indication that the card number entered may not be valid. Please go back and re-enter the number to ensure that all digits were entered correctly.
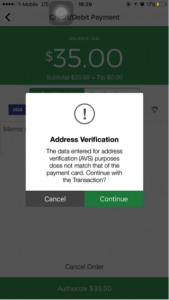
After I tap “Authorize”, why am I getting an error message notifying me of an Address Verification?
This message is alerting you to the fact that the postal code or street address did not match. It is up to you whether you want to tap continue to process the transaction or cancel it and re-try the transaction or ask for a different form of payment.
How can I allow my sales team to take payments on my behalf? Can I add them as users on my account? #
Login to your web dashboard at www.clover.com and select the Employees app. First Name and email address are required. All other fields are optional. Each employee added will receive an email from Clover with a link to verify their email and create a password. They will need to do that before they can activate the app. However, you will need to provide them with the instructions they need to download the app. You will also need to provide them with a card reader.
I entered a Transaction Memo on the payment screen, where can I see it? #
You will see it on the report that you can export from clover.com/orders, but only if Notes is turned on. To do that, go to www.clover.com, click Setup app > Orders and ensure the “Allow Notes on Orders…” box is checked.
If I accept a check as a payment option, do I still need to deposit that check?
Yes. The check feature is a recording-only feature at this time.
Is there a place where I can enter the check #?
We do not have a separate field at this time, but you can use the memo field for that purpose.
Can I control which payment options are displayed in the app? For example, if I do not want my employees to have the ability to record cash transactions, can I suppress that tender type?
Yes. The Admin can log into their Web Dashboard at www.clover.com, click Setup app, select “Payments” and select or deselect “check” or “cash” as a tender type.
NOTE
Not all tender types apply to Clover Go only users at this time.
I unchecked “Show in Register” for an item, why does the item still display in the app inventory?
That feature of the Inventory app is not currently supported.
I added modifier groups/variants/options to an item, so why don’t they display in the app?
That feature of the Inventory app is not currently supported.
I added a signature option in the Payments section of setup, but why did it not reflect in the app?
Not all features of the Clover Dashboard are available to Clover Go-only merchants and this is one such feature.
I set up a service charge option in the Payments section of setup, but why did it not reflect in the app?
Not all features of the Clover Dashboard are available to Clover Go-only merchants and this is one such feature.
I enabled the cash back option in the Payments section of setup, but why did it not reflect in the app?
Not all features of the Clover Dashboard are available to Clover Go-only merchants and this is one such feature.
When I tap an item to add it to the order the app crashes. How do I fix this?
Make sure the region setting in the device is set to United States. You can have any language setting you want, but the region must be set to the U.S.
Reference Site: https://help.clover.com/faq/clover-go-payments-faqs/
Where can I find the Clover Go app? #
For iOS users, search for “Clover Go” in the Apple App Store and download the app.
For Android users, search for “Clover Go” in the Google Play Store and download the app.
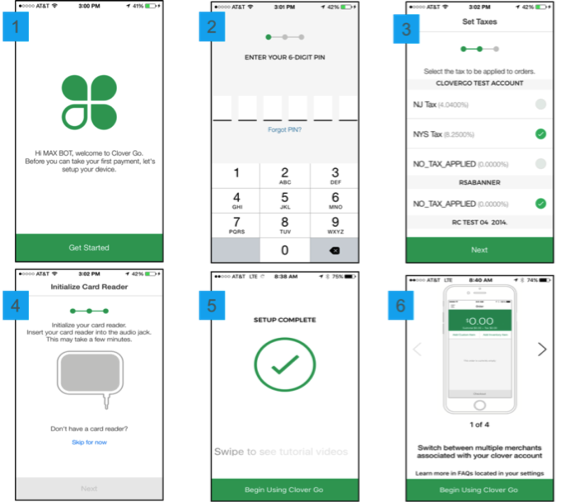
What can I expect after I sign up for my merchant account and what do I need to do to start taking payments? #
Once you sign up, you will receive 2 Welcome Emails and have the Clover Go reader shipped to you. You will need to:
- Create a password: Click on the link in the Welcome Email with the subject line of “Welcome – Clover setup information” to establish your credentials (login & password).
NOTE
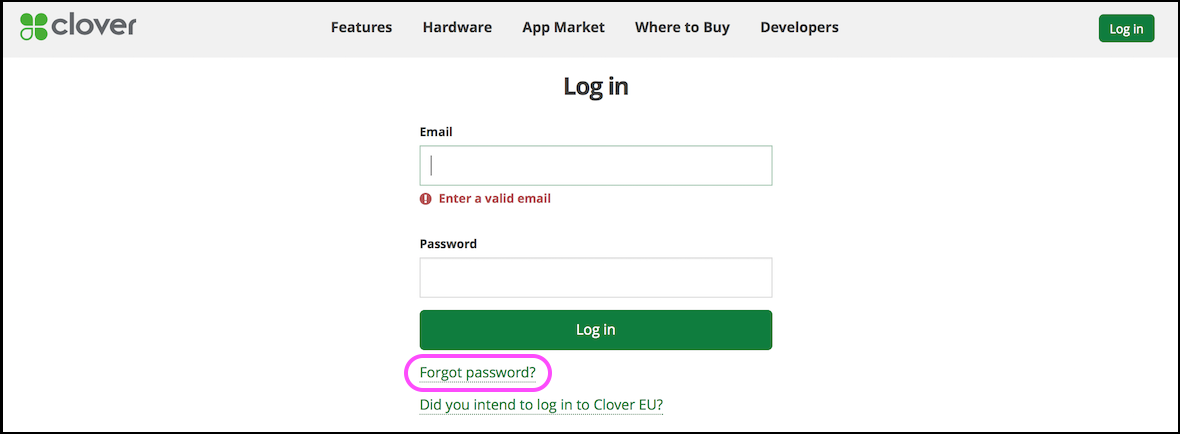
If you did not receive this email or cannot find it, go to www.clover.com, click LOG IN, then click Forgot password? and follow the instructions. Boarding of the merchant account must be completed first to do this.

- Configure your options: When you are logged in to www.clover.com, use the Setup app to configure options such as whether you want the Tip screen to be present, whether you want to use the app to track cash and check transactions, and more
- Download the app: Click on the link in step 3 of the other welcome email or go to the App Store or Google Play store to download the app
- Sign into app and activate using your clover.com credentials

- Take Payments: Follow the prompts to set up your app, and then you can start taking payments (screenshots and videos below)


iOS New User Walkthrough Video
Android New User Walkthrough Video
iOS New User Walkthrough Video for Terminal Plan Merchants
Android New User Walkthrough Video for Terminal Plan Merchants
Reference Site: https://help.clover.com/faq/clover-go-quick-start/
When I enter a manual transaction, and need to clear the contents. I can clear the expiration date, but why is the card number not clearing when I tap the back button?
The card number is a separate field, so you will need to tap on the card number field before you can clear the card number.
I entered a Transaction Memo on the payment screen, so why do I not see it on my receipt?
The memo does not print on the receipt. If you want a description printed on the receipt, please use the item description field. The transaction memo does, however, appear on the transaction report. You can view this by logging into the Web Dashboard at www.clover.com and accessing the Orders app.
I entered a Transaction Memo on the payment screen. Where can I see it?
You will see it on the report that you can export from www.clover.com/orders, but only if Notes is turned on. To do that, log into your Web Dashboard at www.clover.com, click Setup app > Orders and check “Allow Notes on Orders”.
How do I send a customer a receipt?
After the transaction is completed, you can tap “Send Receipt” then enter a mobile number and/or email address then tap “Send”.
How do I resend a receipt?
Open the Settings drawer and select Transaction History. Tap the transaction you want to resend the receipt for and you will that an option to do so. You can also tap the printer icon to print a copy if you have access to an AirPrint or Google Print enabled printer and it is within range.
Can I set up Clover Go to automatically send a copy of the receipt to a specified email address or mobile phone number?
Yes. In the Settings Drawer tap Settings, then “Carbon Copy Receipts”. You can add up to three email addresses and three text numbers and have a copy of the receipt sent to them automatically any time a any Employee under this account (regardless of role) processes a sale or a refund.
Can I print a copy of the receipt?
Yes. If you have access to a Google Print or Air Print enabled printer and it is in range, you can tap on the icon in the upper right corner on the confirmation screen or the transaction history screen to access that capability.
Note: For Android the OS must be 4.4 or higher for Google Print to work in the app.
I can’t get Google Print or AirPrint to work. What do I do?
You need to contact tech support at Google or Apple for help.
Who can add, change or delete recipient information for carbon copy receipts?
Only a user with Admin rights will be able to add, change or delete recipient information for carbon copy receipts. Anyone with an Employee or Manager role will be able to see where carbon copies go, but will not be able to modify.
Can I limit when carbon copy receipts are sent or which employees they are send from?
No. Carbon copy receipts are at the account level. Copies of receipts will be sent to the designated addresses and/or mobile phone numbers for every Sale and Refund made by every Employee, regardless of role, set up under that account.
If I set up users to receive carbon copies of my receipts, will they only go out when I send a receipt to my customer?
No. If you set up users to receive carbon copies of receipts, they will always receive a copy regardless of whether you send a copy to your customer.
If I set up users to receive carbon copies of my receipts, will they also receive a copy when I resend a copy of the receipt?
No. Users designated to receive carbon copies of receipts will receive them only upon completion of a sale or refund.
I am in Quick Mode and entered an item description. Why does the receipt just shows the word “item” instead of the description that I entered?
Please enter the item description and tap “done” first, then enter the amount and tap “checkout”.
Reference Site: https://help.clover.com/faq/clover-go-receipt-faqs/
How can I issue a refund? #
Open the settings drawer and select Transaction History. Tap the transaction you want to refund and, if you are an Admin or Owner, you will see an option to issue a refund or resend the receipt.
Can I issue a refund to a different card than the one my customer used to purchase the item? #
No. Refunds will only go back to the card used to purchase the item.
I am usually able to refund each item in my order. But, for some reason this time I am only able to refund specific amounts. Do you know why that would happen? #
Most likely, your customer used a prepaid card to pay for the original transaction and a single card does not have sufficient funds to cover the entire amount and additional payment was required. In that case, you can only refund the amount charged to each card.
Can I use Quick Refund to refund transactions done in Inventory Mode?
No. It can only be used for Quick Mode transactions.
Reference Site: https://help.clover.com/faq/clover-go-refunds-faqs/
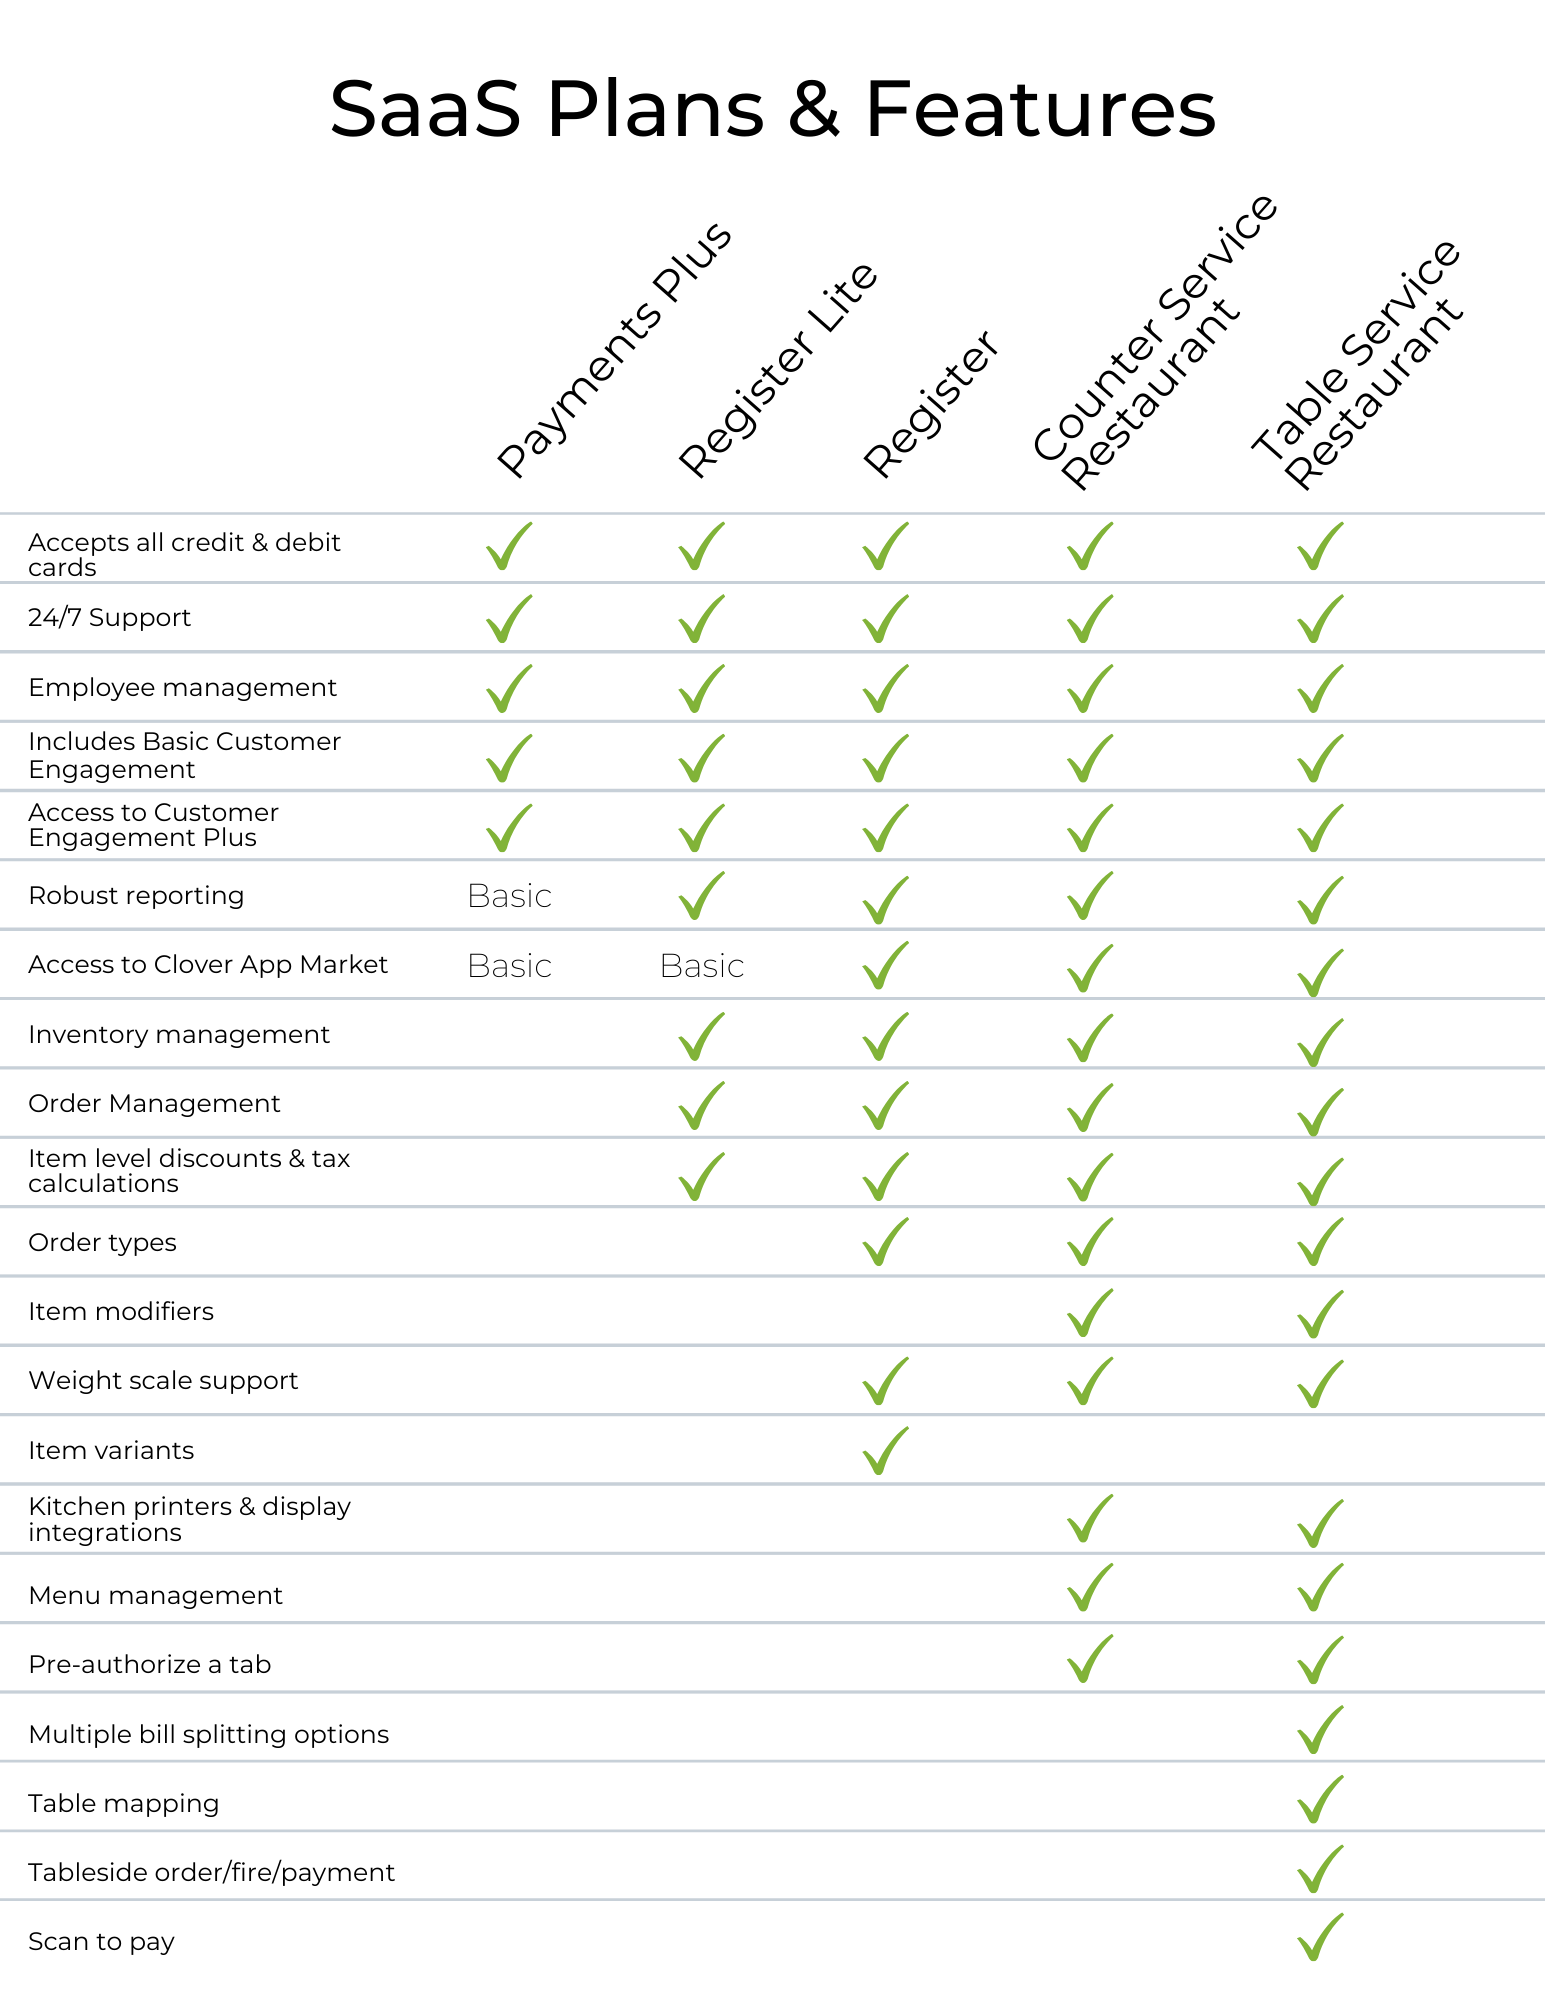
With Clover Mini, Flex, Station 2018 and new Pro you’ll get to choose which monthly plan makes the most sense for your business. Since everyone’s different, Clover allows you to select the plan that works best for you. The remaining monthly fees, below, are charged by Clover directly and billed to the bank account on file. Read about each plan, below.
Payments Plus – $4.95 per device/month
The Payments Plus plan is the most basic Clover plan, but carries no additional monthly fees. With the Payments Plus plan, you’ll get:
- Cloud-based payments
- Employee Management for clocking in/out
- Customer Management (save profiles, purchase data, etc)
- Accept all forms of payment (Chip+PIN, Apple Pay, EBT)
- Allows for Open Tabs
- Allows for discount-based rewards
- Limited access to the Clover App Market
The Payments Plus plan is a great way to get to know Clover. If you don’t have the need to track inventory or utilize many third-party apps, then this could be a great solution for you. And remember, Clover makes it easy to switch plans whenever you’d like!
Register Lite Plan – $9.95 per device/month
Register Lite is a Clover plan that offers a small taste of what the actual Register Plan can do. It’s commonly known as a “cash register replacement”. It has the same features as the Payments Plus plan (above) but also includes:
- More advanced Order Management – you can create, save, and refund specific orders
- You can also assign item categories, numbers, and notes to specific orders for easier tracking
- Inventory management to allow you to manage simple items and track the stock levels of your current inventory
- Deeper access to the third-party App Market for Clover apps – apps that integrate with items/orders are allowed
- You can tether a customer-facing display, if desired
- Tax calculation can be set at a per-item level
- Rewards can be set at a per-item level
Unless you have the need to integrate with kitchen printers or access specific upper-level apps, this plan works perfectly for most retailers.
Register Plan – $39.95 first device/month & $9.95 per additional device
The Register plan is the most commonly used Clover plan, and allows access to all Register Lite Bundle + More. This would be best for Retail locations or QSR that don’t need the option for Kitchen Printers.
- Inventory items can have costs associated with them, to track over time
- Item exchanges are built-in
- You can create specific “types” of orders, and combine multiple orders (great for restaurants)
- Weight Scale support
- Item Variants
- Full access to the App Market
Counter Service Restaurant Plan – $39.95 first device/month & $9.95 per additional device
The Counter Service Plan would be the ideal fit for a setting of a Quick Service Restaurant or businesses that have a line at the Point of Sale. This offers the business additional features to help run and maintain their business as they see fit. This come with additional features such as:
- Kitchen Printer & Display Integrations to help ticket times
- No longer has Item variants but upgraded to FULL Menu Management
- Pre-Auth capability – GREAT for bars/restaurants
Table Service Restaurant – $69.95 first device/month & $9.95 per additional device.
The Table Service Restaurant is the most popular plan offered and will only get better with time. This Plan offers everything stated previously AND MORE! This will be mostly used for Food Industry business that require the whole package. This will offer FULL Menu Management, FULL Kitchen Printer and Display Integrations, Item Modifiers and more below:
- Multiple Bill Splitting Options
- With and without Tabs
- Table Mapping through the Clover Dining App
- Offers ability to Virtually recreate your entire establishment for easy table orders
- Tableside order, fire, and payments
- NEW Scan to Pay
- ApplePay transactions through Barcode on receipts
If you have any questions, please refer to the SaaS Plans & Features display below.
How do I view my past transactions?
Open the Settings Drawer and tap “Transaction History”. You can tap on an individual transaction to look at a copy of the receipt. The Transaction History can also be accessed via the Transactions app in the Web Dashboard.

Why do I only see the last seven days of transactions in the Transaction History?
The display defaults to the last seven days. You can change the date range by tapping the Filter icon or the word “refine” (depending on device) in the upper right corner. You can enter a date range and/or choose the sort order, then tap “Apply” to get a different view.

Reference Site: https://help.clover.com/faq/clover-transactions-report-faqs/
What’s Eligible for a Swap? Big Devices.
Clover is provided directly by First Data, and as such, they have specific warranty information based on each product. All main Clover devices (Station, Mini, and Mobile) are covered by a one-year, full swap-out warranty. Basically, if any of your main Clover hardware devices become defective due to manufacturer/hardware based issues, your unit will be swapped out free of charge.
Please note – this swap out is for defective devices only! Just like with your cell phone or any other electronic device you purchase, if you drop a device or break it in some other way, that’ll be your responsibility to replace as the device owner.
Replacements for DOA (Dead on Arrival) Devices
Naturally, if you receive a Clover product that arrives in a non-functional state, that will be replaced quickly and free of charge! This applies to all Clover products, including the Clover Go product line and all Clover accessories. You’re guaranteed to have a fully functional device when it arrives, and it’ll be replaced if not.
However, Clover Go units and ancillary devices (such as printers/cash drawers) are not warrantied. Should these devices break, it’ll be your responsibility to replace them down the line.
Buyer’s Remorse Policy
Deploying a Clover system is a big task on our side, and carries several costs. As such, we highly recommend ensuring that you determine Clover is perfect for you before getting started! However, should you sign up for Clover and later determine it won’t meet your needs, there is a way out.
Clover allows for a 30 day Buyer’s Remorse policy. If you find within 30 days of deployment that Clover isn’t a great fit, you can return your devices for a refund of the purchase price, minus a $250 fee. Should you have any questions about how this works, please reach out and ask.
Clover Station and Clover Mini (if on the Pro Service Plan) can be connected to and use the cash drawer via the RJ-11 6P6C cable.
Clover Mobile is designed to be mobile and is not designed to connect with a cash drawer via Bluetooth or other means.
The cash drawer is meant to be connected to one Clover device at a time (for the purposes of cash log tracking) but it can be opened at anytime with a cash drawer key.
Reference Site: https://help.clover.com/faq/do-clover-mobile-and-clover-mini-connect-to-a-cash-drawer/
Our third party apps E-commerce solutions for you, including:
- Sell Online by Ecwid
- Shopify Integration
- The clover also come with FREE Online Order service
Reference Site: https://help.clover.com/faq/does-clover-integrate-with-e-commerce/
Clover Mini does NOT have a dial-up option. Clover Mini DOES have an option to connect to an Ethernet cord and connect to a cash drawer via a RJ-11 6P6C cable.

Reference Site: https://help.clover.com/faq/does-clover-mini-have-a-dial-up-option/
Yes. Currently, we support the following for EBT (Electronic Benefit Transfer) cards:
- Type of EBT: Cash Benefit, SNAP Food Benefit
- Card type: Magnetic stripe, manual card entry
- Ability to take a sale
- Ability to withdraw
- Cashback
- Balance inquiry
- Voids (within 25 minutes)
Learn about using the EBT app.
In the future, we will also support:
- Card type: EMV (chip cards)
Reference Site: https://help.clover.com/faq/does-clover-support-ebt/
Clover does not currently support layaway directly on Register app ![]() . Third party apps may support layaway in the future.
. Third party apps may support layaway in the future.
First Data has launched a Telecheck app on the Clover platform. Once the Telecheck app has been downloaded and installed on your Clover device, you can start accepting payments in Telecheck.
Reference Site: https://help.clover.com/faq/does-clover-support-telecheck/
Yes. Just like Clover Station, a Clover Mobile and Clover Mini can connect to a Kitchen Printer as long as the devices are all on the same LAN (local area network).
NOTE
If you are on the FD2000 Plan, you will not have any orders to send to a Kitchen Printer (or any Order printer) because you will be taking transactions instead of orders. Please upgrade to the Pro Service Plan if you would like to send orders to a Kitchen Printer.
Apps to help your Business Succeed
Clover allows full access to their app store, so that you can get the additional tools you need to run your business like a pro. Download apps made by Clover, or apps that have been created by third-party developers to help you integrate with outside services. Popular apps include:
- Bar Tab Auths – Easily open and view bar tab authorizations so that you can manage the bar and quickly open/close tabs.
- Happy Hour – Create custom definitions of happy hours with percentage or dollar-value discounts that apply to certain product types and in certain time-frames.
- MailChimp – Automatically sync new customer email addresses with your MailChimp subscription lists, so you can stay in touch with your customers.
When customers are using the Clover Mini as customer-facing device, the Clover Mini is placed into customer mode.
Ensure that a PIN is required when leaving customer mode by verifying that REQUIRE PIN ON EXIT is turned ON in the bottom bar. This will require an employee PIN to return the Clover Mini device to merchant-facing mode.
Reference Site: https://help.clover.com/faq/how-can-i-be-sure-that-customers-can-not-access-other-apps-on-clover-mini-when-its-used-as-a-customer-facing-device/
If you are on autoclose and you would like to change your batch closeout time, please contact customer support with your new closeout time request.
Reference Site: https://help.clover.com/faq/how-do-i-change-my-batch-closeout-time/
Clover for any Business Type
Clover is designed to be customized for every type of business. Clover has easy step-by-step instructions for three major business types:
- Full Service (Sit Down) Restaurants: Customize Clover to show tables and servers, and adjust your tips at the end of every night. Easily run server reports, tip reports, or table reports. Keep multiple orders open simultaneously, and easily manage open bar tabs/authorizations.
- Quick Service (Fast Food) Restaurants: Clover helps speed up your long lines by allowing you to remove the need for signatures on small sales. Quickly create inventory categories and items, and apply variants/modifiers with ease. The front-facing camera allows you to quickly scan barcodes on receipts so that you can call up past orders as fast as you can place the receipt in front of the camera!
- Retail/Service Merchants: Easily create in-depth inventory items, and easily manage ongoing discounts. Keep track of your customers and their purchases, and allow customers to opt-in to email marketing campaigns. Easily download Marketplace Apps so that you can further customize your business with Happy Hour discounts and other advanced features.
With the introduction of taking EMV transactions on the devices themselves, there will NOT be any Test Mode available on our Clover Mobile and Clover Mini devices.
If you would like to run a test transaction the devices, please run a small (i.e. $1.00) transaction within Sale ![]() app and refund the amount right afterwards.
app and refund the amount right afterwards.
Reference Site: https://help.clover.com/faq/how-do-i-enable-test-mode-on-my-clover-mini-or-clover-mobile/
To import/edit your inventory items, you’ll need to use your Clover credentials and login to the Web Dashboard. Once logged in, you’ll want to follow the instructions on this page to download a template for your inventory items, which you can then fill-out and re-import. The basic steps are:
- Download the template from the Web Dashboard.
- Fill out the template with your inventory details, which will include item names, prices, and any other data such as tax rate, cost, and barcodes that you wish to include.
- You’ll have the option to create modifiers and variants, as well as product categories.
- After completion, you’ll import your list back into Clover using the Web Dashboard.
- After saving, all imported inventory items will immediately appear on all Clover devices!
The Clover Station and Clover Mini are certified by the National Type Evaluation Program (NTEP). You can see the first page of the Certificate of Conformance below, and the full certificate here.

To show that your device is certified, a sticker containing the certification number and information on devices that were certified is included in the box containing your weight scale device. Place this sticker on the bottom of your Clover Station or Clover Mini.
If you do not have a sticker, you can see certification information on your Clover device.
NOTE
Clover’s NTEP scale certification will not expire.
To see scale certification information on a Clover device:
- Open Help app
- Tap the top-left menu button

- Tap Diagnostics
- Tap Scale Certification Information to see your Clover device’s certification information


A Clover Mobile device can be paired with up to one Clover Mobile Printer at a time.
A Clover Mobile Printer can be paired with up to 6 Clover Mobile devices at a time.
IF A CUSTOMER PRINTS A RECEIPT FROM A TETHERED CLOVER MINI, WHICH DEVICE WILL PRINT OUT THE RECEIPT?
If a customer-facing Clover Mini is tethered to a merchant-facing Clover Mini or a merchant-facing Clover Station and a customer or merchant selects the option to print out the customer receipt, the merchant-facing Clover device will print out the receipt. The merchant can then take the receipt and hand it to the customer.
Reference Site: https://help.clover.com/faq/if-a-customer-prints-a-receipt-from-a-tethered-clover-mini-which-device-will-print-out-the-receipt/
- View the order in Tables app
- Tap Leave Table next to Guest 2, who is leaving
- Tap Pay for Items
- Tap Pay to confirm that whole table items will be left for the table to pay
- Complete Guest 2’s payment
- Guest 1 can continue to add items to their order
NOTE
If you tap Pay for Items or Pay before tapping Leave Table, Guest 2 can still pay for their items but no further items may be added for any guest at this table.
Reference Site: https://help.clover.com/faq/if-guest-1-stays-and-guest-2-leaves-how-can-i-allow-guest-1-to-continue-adding-items-to-their-order-while-taking-payment-from-guest-2-tables-app/
You can only process card transactions offline for seven (7) consecutive days. After seven (7) consecutive days offline, your Clover device will disallow card transactions.
You will need to be connected to the internet in order to activate your Clover device.
After activation, your Clover device will be able to function and take transactions while offline (assuming that it’s connected to a power source). However, we recommend that you have a strong connection to the internet at all times because:
- If you take debit or credit card transactions offline, then we will authenticate the cards only after the device is re-connected to the internet.
- Your debit or credit card transactions will not be closed out until they’ve had a chance to sync to the internet.
- Any updates you make on your offline Clover device will not sync to any other Clover device or to your Web Dashboard until the device is reconnected to the internet and vice versa.
- Offline devices will not receive the latest app updates.
- Offline devices will not be able to access certain apps, like the App Market, Card Transactions app, Reporting app, etc.
After activation you don’t absolutely need to have an internet connection (if you are only running cash and check transactions), but without a connection to the internet you won’t be able to use your Web Dashboard and other powerful Clover features.
Reference Site: https://help.clover.com/faq/is-an-internet-connection-required-to-use-a-clover-device/
Not all Clover apps or third party apps are available across all of the Clover devices. Some apps are designed specifically for certain devices and some apps are expanding to more devices. To check a particular app’s availability on your Clover device, please do the following:
- Go to clover.com/appmarket or on your Clover device, click on App Market
- Click on the app of interest
- Under the app name, the availability across the different Clover devices will be listed after, “Available on:”
Reference Site: https://help.clover.com/faq/is-this-app-available-on-my-clover-device/
The Clover Station Printer takes 3 1/8” X 230’ thermal paper rolls.
Clover Mini and Clover Mobile take 2 1/4″ x 85′ thermal paper rolls (also used by the FD130 terminal).
The Star SP700 Kitchen Printer (also commonly referred to as the ‘impact printer’) takes 3” X 150’ paper rolls, which can be purchased through your merchant services provider or other retailers.
These printer rolls can be purchased through your merchant services provider or other retailers.
Reference Site: https://help.clover.com/faq/printer-paper-sizes/
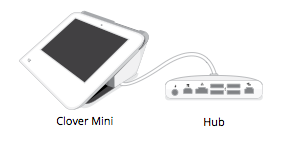
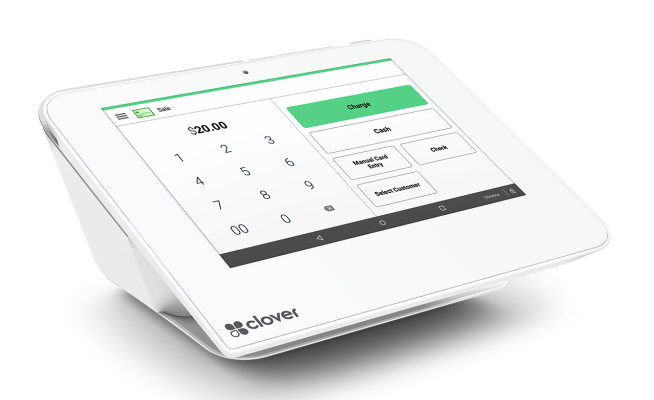
Clover Mini
Click to view a Step-by-Step Activation Guide, or watch the below video for a quick introduction on how to easily get your Clover Mini system ready to go.
Clover Mobile
Click to view a Step-by-Step Activation Guide, or watch the below video for a quick introduction on how to easily get your Clover Mobile ready to go.
Clover Station
Click to view a Step-by-Step Activation Guide, or watch the below video for a quick introduction on how to easily get your Clover Station ready to go.
You may have recently noticed an influx of third party apps. Currently we have a handful, with many more to come. Here are some common frequently asked questions.
What does it mean if an app is a third party app?
Think about Apple’s iPhone, which is a platform for many apps. While Apple makes a good number of their own apps, many non-Apple developers also make apps that are available in the iPhone’s App Store.
Similarly, Clover has not only apps built by Clover engineers, but it’s also a platform for apps built by other developers, available in the App Market ![]() .
.
How can you tell if an app is a Clover app or a third party app?
If you go into the App Market ![]() , you will see the apps that are available and installed. Underneath each app name is the company that made the app as well as the price of that app. So, if the app is not made “by Clover”, then it is a third party app.
, you will see the apps that are available and installed. Underneath each app name is the company that made the app as well as the price of that app. So, if the app is not made “by Clover”, then it is a third party app.
Is Clover responsible for the functionality of a third party app?
Since third party apps are owned and managed by non-Clover employees, if there is something wrong with a third party app, please contact the developers directly to get the latest updates on the status of their app. Their contact info is listed in the App Market ![]() under the app’s Details.
under the app’s Details.
Reference Site: https://help.clover.com/faq/3rd-party-apps-faq/


Reference Site: https://help.clover.com/faq/what-are-clover-mobile-product-specifications/
On iPhone and Android Phone:
- Transactions section: Includes gross payments, refunds, net sales, tips collected, and average tip percentage,
- Batches section: Includes information on each batch (open or closed) associated with the current day.
- Tender Types: Includes up to 4 tender types. Clover includes default tender types (including Cash, Credit/Debit card, and Check) or you can create new tender types in your Web Dashboard. All other transactions will be grouped into Other.
- Card Types: Includes up to 4 card types (such as Visa, Mastercard, Discover, American Express, etc.). All other card types are grouped into Other.
- Revenue breakdown by employee: Amount of Net Sales per Employee (iPhone only)
On Apple Watch:
- Sales
- Compare last week to today
- Employee Shifts
- Active Tables
Barcode Scanner / Camera
In order to activate the barcode scanner / camera on Clover Station and Clover Mini, tap the barcode icon on the bottom left of the screen within any app. For Clover Station, the camera is back-facing and located on the left and for Clover Mini, the camera is front-facing and on the top of the screen. In order to activate the barcode scanner / camera on Clover Mobile, press the trigger located on the handle. This will activate the camera and red light on the side of the Clover Mobile handle. Clover Mobile also has a front-facing camera located in one of the Clover leaves toward the upper left hand side of the screen. This camera can be activated in the Camera app and potentially other apps going forward.
All cameras across all Clover devices can be used to scan barcodes on physical receipts, scan inventory items, scan QR codes, take pictures, etc. depending on the app used to access the camera.
Cash Drawer
Clover Station and Clover Mini (if on the Pro Service Plan) can be connected to and use the cash drawer via the RJ-11 6P6C cable. Clover Mobile is designed to be mobile and is not designed to connect with a cash drawer via Bluetooth or other means. The cash drawer is meant to be connected to one device at a time (for the purposes of clear cash log tracking) but it can be opened at anytime with a key.
Clover Browser app
Clover Mobile / Clover Mini will not have the Clover Browser app in order to comply with the strict security we need to follow on these new PIN-entry devices.
Factory Reset
Factory resetting on Clover Mobile / Clover Mini will require an employee to enter their PIN.
Network Connectivity
Clover Station will have the option of connecting via Ethernet and Wi-Fi. Clover Mobile and Clover Mini have two hardware options each: Clover Mobile Wi-Fi or Clover Mobile 3G (3G enabled) and Clover Mini Wi-Fi or Clover Mini 3G (3G enabled). Clover Mobile will have the option of connecting via Wi-Fi and 3G (if Clover Mobile is 3G enabled). Clover Mini will have the option of connecting via Ethernet, Wi-Fi, and 3G (if Clover Mini is 3G enabled).
New Clover Mobile / Clover Mini apps
Clover Station will not (initially) include the following new apps:
- Authorizations app
- Bar Tab Auths app
- Closeout app
- Mobile Printer app
- Sale app
- Phone Sale app
- Refund app
- Voice Auth app
- Transactions app
- Wireless Manager app
Offline processing
All Clover devices (if they are on the Pro Service Plan) have the ability to take cash, check, and other transaction types that do not require connection to the internet. Clover Station has the ability to process offline card transactions. Clover Mini and Clover Mobile do NOT have the ability to process offline card transactions, because EMV transactions cannot be processed offline.
Pay Screen
Register app’s pay screen on Clover Mobile / Clover Mini does not include the CURRENT ORDER pane.
Plans
If you have a Clover Station (and any combination of Clover Mobile or Clover Mini devices), you will automatically be rolled into the Pro Service Plan. All the apps in the App Market ![]() will be available to you, as long as they are supported on your Clover device. If you do NOT have a Clover Station and you have Clover Mobile or Clover Mini devices only, you will have the option to enroll in the FD2000 Plan. You can upgrade to the Pro Service Plan at anytime through the App Market
will be available to you, as long as they are supported on your Clover device. If you do NOT have a Clover Station and you have Clover Mobile or Clover Mini devices only, you will have the option to enroll in the FD2000 Plan. You can upgrade to the Pro Service Plan at anytime through the App Market ![]() .
.
Rebooting
On Clover Station and Clover Mini, you can swipe down from the upper right hand corner from the device and tap “Reboot” from the menu that appears in order to reboot the device. On Clover Mobile, you will need to hold the white power button on the back of the device down for 2 seconds, tap “Power off” in the popup notification, and hold the same white button on the back of the device to boot the device back up.
Rotation and Merchant-facing vs. Customer-facing Mode
Clover Station has two modes based on its orientation: merchant-facing mode (landscape) vs. customer-facing mode (portrait). The Clover Mobile can be hand-held. As such, Clover Mobile will not automatically switch to customer mode every time the Clover Mobile is in a portrait orientation in particular apps (like Register app). Instead, Register app, Orders app, and other apps will have a “Show Summary” button and customer-facing mode button on the bottom left of the screen which when tapped, will change from merchant-facing to customer-facing mode. Clover Mini will be fixed to landscape orientation and will similarly have a “Show Summary” button and customer-facing mode buttons on the bottom left of the screen.
Settings app
The Settings icon is different between Clover Mobile / Clover Mini (cog) and Station (sliders)
Setup Wizard
For Clover Mobile and Clover Mini, we will ask some configuring settings questions.
Test Mode
With the introduction of taking EMV transactions on the devices themselves, there will NOT be any Test Mode available on our Clover Mobile and Clover Mini devices. If you would like to run a test transaction the devices, please run a small (i.e. $1.00) transaction within Sale ![]() app and refund the amount right afterwards.
app and refund the amount right afterwards.
Unlock Feature
For terminal parity, Clover Mobile / Clover Mini’s lock screen will support an Unlock button with no PIN entry if the merchant sets a “Default Employee” in Clover Mobile / Clover Mini’s setup. (If the merchant has a Clover Station and has this option selected, the Clover Station will not support the unlock feature for the time being.)
Reference Site: https://help.clover.com/faq/what-are-some-differences-between-clover-station-and-clover-mobile-mini/
- Retailer must comply with the provisions of the Retailer Agreement and with the US Department of Agrigulcture Food and Nutrition Service FNS Food Stamp Program Guidelines.
- Retailers are not allowed to set a minimum dollar amount for an EBT (Electronic Benefit Transfer) transaction.
- Cardholder must enter their own PIN. Under no circumstances may a retailer or a retailer’s employee enter a cardholder’s PIN.
- The retailer must give the cardholder a printed receipt for each transaction. When a paper voucher is used, the cardholder must be given a copy of the voucher.
- Retailers must submit all EBT transactions on-line. Paper vouchers must be keyed into the terminal by a Voucher Clear transaction (Sale or Refund) within 10 days.
- Refunds made to Cash Accounts must be given in cash or store credit. There is no electronic transaction to issue a refund to a Cash Account.
- Refunds given to Food Stamp accounts must be given as a credit to the cardholder’s account.
Reference Site: https://help.clover.com/faq/what-are-some-guidelines-around-ebt/
Register Lite Plan is one of the Clover Service Plans, which also include Payments Plus Plan (formerly called Terminal Plan) and Register Plan. These plans are available for merchant accounts that do not include a Clover Station. Accounts with Clover Stations are automatically assigned to Classic Plan.
Register Lite Plan provides simple inventory and order management for businesses that want the functionality of an electronic cash register and a payment terminal in a single device. It allows you to take payments, track inventory, manage employees, send marketing campaigns, and monitor your business from anywhere.
NOTE
Register Lite will be available for merchant accounts that do not include a Clover Station; in other words, that only have Clover Mini(s) and/or Clover Mobile(s). Accounts with Clover Station are automatically assigned to Classic Plan.
See below for instructions on how to switch plans and an overview of all three Clover Service Plans.
Clover Service Plans |
|||
| Payments Plus (formerly Terminal) | Register Lite | Register
(called Classic, for accounts with Clover Stations) |
|
| Overview | Smart, cloud-based payments, employee and customer management, in one device | All Payments Plus features, plus simple inventory and order management in one device; cash register replacement | All Payments Plus and Register Lite features, plus full-featured POS with enhanced inventory and order management |
| Payments — accepts all forms |
✓ |
✓ |
✓ |
| Employee management |
✓ |
✓ |
✓ |
| Customer Engagement |
✓ |
✓ |
✓ |
| Inventory Management |
✓Basic Simple items Stock tracking |
✓Enhanced Items with modifiers and variants Track cost Exchange items |
|
| Order Management |
✓Basic Create, save, and refund orders Item categories Assign numbers and add notes to orders |
✓Enhanced Order types Combine multiple orders |
|
| Additional Features | Open tabs
Discount-based rewards Limited access to Clover App Market |
All additional features for Payments Plus, plus…
Connect to customer facing display (tethered) Item level discounts Item level tax calculations Item level rewards Access to Clover App Market apps integrated with items & orders |
All additional features for Payments Plus and Register Lite, plus…
Remote order (kitchen) printing Kitchen order display Support for larger 11.6” touch screen Weight scale support Full access to Clover App Market |
To change your service plan:
- Open App Market
- Tap the menu button on the upper left

- Tap Service Plans
- Your current plan will be highlighted in green
- Tap Authorize for the service plan you want to switch to
- Confirm plan switch
- After completing, tap the Windowed View icon at the bottom of the screen, then hold and swipe downwards on each window to close the open apps


Reference Site: https://help.clover.com/faq/what-is-register-lite-plan/
WHAT IS SMS TWO-FACTOR AUTHENTICATION & WHY IS IT IMPORTANT FOR LOGGING INTO MY CLOVER WEB DASHBOARD
SMS Two-Factor Authentication is a security measure clover.com uses to better protect your merchant information and ensure that only the people you choose to give access to your business’ web dashboard can access it.
After you enable this feature, you will need both your password and your phone to log in to your account. When you log in to your Web Dashboard you will receive a text message with a login code.
IMPORTANT
We strongly recommend all merchants use two-factor authentication to secure their business, transaction, employee, and customer information.
Reference Site: https://help.clover.com/faq/what-is-sms-two-factor-authentication-why-is-it-important-for-logging-into-my-clover-web-dashboard/
We increased the maximum contactless transaction limit from $100.00 to $99,999.99 for FD40, Clover Mini and Clover Mobile devices.
- Your customers will now be able to “tap” contactless enabled cards and phones (i.e. Apple Pay) for transactions larger than $100.00.
- The increase in limit does not mean all transactions will be approved.
- The device itself will no longer prohibit larger ticket items from being attempted in contactless mode.
- The transaction will route to the Issuer and ultimately it is their decision on whether or not the transaction will be approved.
- Clover Mobile & Clover Mini – Friday, August 21st.
- FD40 – Tuesday, August 25th.
- Clover Mobile & Clover Mini – Nothing. Your Clover Mobile and Clover Mini devices update nightly with a reboot.
- FD40 – You will need to reboot your Clover Station. This will prompt an update within the PIN Pad app and a reboot the FD40. Once the devices reboot, the new updates will be available on your FD40.
- Your new version of the PIN Pad app will not automatically update as your Clover Station will not automatically reboot. If you are still experiencing a limit of $100 on your FD40, you should reboot your Clover Station.
- If you do not reboot your Clover Station, you will receive the update with the release of the next version of PIN Pad app.
Reference Site: https://help.clover.com/faq/what-is-the-contactless-transaction-limit/
If you are logging into your Clover Mobile or Clover Mini by tapping “UNLOCK” instead entering your employee PIN on the lock screen, you will be logging in as a “Default Employee” who has limited permissions.
If you would like access more robust features such as reporting, refunding, closing out, etc, please log in with an admin or owner’s PIN.

Reference Site: https://help.clover.com/faq/what-is-the-difference-between-logging-in-when-tapping-unlock-vs-entering-my-pin/
Opening a tab in Tables app ![]() involves opening a Seating Group and potentially swiping a card to add the customer’s name to the order. The card is not preauthorized for any amount.
involves opening a Seating Group and potentially swiping a card to add the customer’s name to the order. The card is not preauthorized for any amount.
Opening a tab in Authorizations app ![]() or Bar Tabs Auths app
or Bar Tabs Auths app ![]() involves first entering an amount and then swiping a card to preauthorize that amount.
involves first entering an amount and then swiping a card to preauthorize that amount.
Reference Site: https://help.clover.com/faq/what-is-the-difference-between-opening-a-tab-in-tables-app-vs-opening-a-tab-in-authorizations-app-or-bar-tabs-auth-app/
We will now support import, export and usage of 15,000 inventory items, so you can now import and export inventory CSV files up to 15,000 items, 2,000 modifiers, 100 modifier groups, and 100 categories in the Inventory web app. All items, modifiers, categories etc. will sync to their Clover Station and can be used in Register app ![]() and Inventory app
and Inventory app ![]() .
.
If there is a security issue with your Clover device, please email security@clover.com and include a detailed report of how the product is behaving or if any event have occurred that have raised your concerns.
If you accidentally disconnect your customer-facing Clover Mini from a tethered Merchant Keypad, a merchant-facing Clove Mini, or Clover Station, your customer-facing Clover Mini will switch into merchant-facing mode and display the PIN login screen.
This is not an error. This is because of a security feature from Apple Pay to protect your customer’s credit card number. When a customer pays with Apple Pay, it assigns a unique payment token which is saved in their system instead of the customer’s credit card number.
This payment token is also used by Clover, which is why the last 4 digits on receipts and the Clover device do not match the last 4 digits of the customer’s credit card.
Reference Site: https://help.clover.com/faq/when-a-customer-pays-with-apple-pay-why-dont-the-last-4-digits-match/
If you have admin access, you can manually close at anytime from Closeout app ![]() or Orders app
or Orders app ![]() . If you are on autoclose, your autoclose time will still process at its designated time.
. If you are on autoclose, your autoclose time will still process at its designated time.
NOTE
If you are manually closing out Closeout app ![]() , you will be prompted to enter tips for all transactions without designated tips. If you are manually closing out from Orders app
, you will be prompted to enter tips for all transactions without designated tips. If you are manually closing out from Orders app ![]() (only available to merchants on Pro plan), you will not need to designate tips for any order.
(only available to merchants on Pro plan), you will not need to designate tips for any order.
Reference Site: https://help.clover.com/faq/when-can-i-manually-batch-or-manually-close-out/
|
Barcode Format
|
Clover Station
|
Clover Mini
|
Clover Mobile
|
| GSI-128 | Yes | Yes | Yes |
| Code 39 | Yes | Yes | Yes |
| Code 128 | Yes | Yes | Yes |
| UPCa | Yes | Yes | Yes |
| EAN13 | Yes | Yes | Yes |
| QR-Code | Yes | Yes | Yes |
| Aztec | No | No | Yes |
| GSI Databar | No | No | Yes |
| UPCe | No | No | Yes |
| PDF417 | No | No | Yes |
| Data Matrix | No | No | Yes |
| Maxi Code | No | No | Yes |
| Postnet | No | No | Yes |
| Databar Truncated | No | No | Yes |
| Databar Omni-Directional Stacked | No | No | Yes |
| EAN8 | No | No | Yes |
| Planet | No | No | Yes |
| Codabar | No | No | No |
| Interleaved 2 of 5 | No | No | No |
| Industrial 2 of 5 | No | No | No |
| Code 93 | No | No | No |
| MICR CMC7 | No | No | No |
| DataBar Expanded | No | No | No |
| Databar Stacked | No | No | No |
| GSI Databar Coupon Code | No | No | No |
| Code II | No | No | No |
| GSI Databar Limited | No | No | No |
| MSI Plessey | No | No | No |
| USPS IMb | No | No | No |
| MICR E13B | No | No | No |
| OCRa/OCRb | No | No | No |
Reference Site: https://help.clover.com/faq/which-barcodes-can-my-clover-device-read/
The following scanners are compatible and supported by your Clover Station and Clover Mini:
- Motorola LI2208 Scanner – Clover-customized version (Recommended and available through your Clover salesperson)
- Motorola DS9208
- Motorola DS4208
- IDTECH IDBA-4244SR
- Honeywell MS7580
- Unitech AS10
NOTE
If your scanner does not work with your Clover device right out of the box, you may need to program it by scanning a barcode needed to add a carriage or return line. Check your scanner’s user guide for the barcode and scan it. Your scanner should work with your Clover device after scanning.
Reference Site: https://help.clover.com/faq/which-external-scanners-are-compatible-with-clover-devices/
Clover supports the CAS SW-20 Weight Scale. In order to connect the scale to your Clover Station or Clover Mini, you will need a custom cable that comes bundled with the scale when purchased from your Clover provider.
Due to extra security around Clover Mobile and Clover Mini devices, Clover Mobile and Clover Mini will be compatible with WPA2 networks. They will not be compatible with WEP networks.
How can I tell if my network is WEP vs. WPA2?
If you have an Windows OS computer, view “Wireless Network Connect” to view your wireless networks. Each wireless network will designate whether they are a WPA2 network or not.
If you have a Mac OS computer, view “Network”, click Advanced… and find the network name of interest. The type of network will display under “Security”.
Reference Site: https://help.clover.com/faq/why-cant-i-connect-my-clover-mobile-or-clover-mini-to-my-wifi-network/
An order can be listed as open for the following reasons:
- Any order that has not been paid out will be listed as OPEN. Tapping Save in the Register app will save the order, listing it as OPEN in the Orders app.
- Tapping the Clear Order button in the Register app will clear the order, listing it as OPEN in the Orders app.
- Any order created from the Tables app that has yet to be paid will appear as OPEN. While guests are sitting at the table and have yet to pay, the order will appear as OPEN.
- If you have a printed receipt showing that the order was paid for, but the order looks like it’s still OPEN instead of PAID or PARTIALLY PAID on your Clover device and from the Web Dashboard, please contact Clover Support to help you adjust transactions after the fact. You can find your Clover Support phone number by logging into your Web dashboard and finding your Clover support phone number in the Support box.Please have the following ready:
- Your Merchant ID Number: To verify your identity, you will be asked to provide your Merchant ID Number.
- Physical receipts: These can be faxed or emailed when necessary.
Reference Site: https://help.clover.com/faq/why-is-an-order-listed-as-open/
Yes, if you have one of the following in place:
1) An eligible MCC code – An HSA/FSA card’s particular plan will define a list of eligible Merchant Category Codes (assigned to your business account, set by the card associations). These merchant categories are defined as health care providers because the services they offer are strictly health care related. MCC examples are below:
- 5975 – Hearing Aids-Sales, Service, Supply Stores
- 4119 – Ambulance Services (Dependent on Plan Administrator)
- 5976 – Orthopedic Goods-Artificial Limb Stores
- 7277 – Debt, Marriage, Personal-Counseling Service (Dependent on Plan Administrator)
- 8011 – Doctors-not elsewhere classified
- 8021 – Dentists, Orthodontists
- 8031 – Osteopathic Physicians
- 8041 – Chiropractors
- 8042 – Optometrists, Ophthalmologists
- 8043 – Opticians, Optical Goods, and Eyeglasses
- 8049 – Chiropodists, Podiatrists
- 8050 – Nursing and Personal Care Facilities
- 8062 – Hospitals
- 8071 – Dental and Medical Laboratories
- 8099 – Health Practitioners, Medical Services-not elsewhere classified
2) 90% Registration – This registration must be completed with SIGIS Organization. This program is limited to drug stores or pharmacies (MCC 5912, 5122) that have stores whose gross sales are at least 90% from prescriptions and over the counter (OTC) eligible healthcare products. If you are interested in participating in the 90% Program, you will need to work with the SIGIS Organization directly for the registration process.
You can get more information at https://www.sig-is.org or contact them directly.
SIGIS Helpdesk Phone number : 925-855-3228
SIGIS Helpdesk Email address: help@sig-is.org
Inventory Information Approval System (IIAS)
Clover does not currently support the IIAS, which is an inventory system that sorts a customer’s basket at the POS into items eligible for HSA/FSA and items that are not. At any non-medical retailer (or one without an eligible MCC defined by the cardholder’s plan), IIAS compliance is required to accept HSA/FSA. IIAS applies to all mass, discount, grocery, chain drug, mail order and some pharmacy merchants. The IRS adopted this requirement in 2006.
HSA/FSA cards are prepaid debit cards (Visa and MasterCard) that can be accepted as Signature Debit or PIN Debit. The cards have no extra level of data associated with them, but they are associated as HSA/FSA to the networks.
Reference Site: https://help.clover.com/faq/will-i-be-able-to-accept-hsa-or-fsa-from-my-customers/
At 1st Merchant, paper supply is free. You can come and pick up at our office at 6251 Smithpointe Dr Unit 220, Norcross, GA 30092. However, if you are too far a way, we can ship the paper supplies to you (shipping fee is not covered). Please call 877-851-3594 Customer Service to place order for paper supply today.
At 1st Merchant, our primary goal is to earn your trust and become the last merchant services provider that your business will ever need. We are fully committed to providing the very best solutions and support that will help successfully grow and manage your business well into the future.
One of the most important questions about merchant services. There should not be any contracts locking you down. You should have the control of how and when you use a merchant service provider. Stay if you’re happy but leave when the customer service is not cutting it.
You will be set up to accept Visa, Mastercard, Discover, American Express, Apple Pay, Google Pay, and Samsung Pay.
Process time is approximately 1 day after all required application information is received. Once approved, we will inform you and deliver your equipment.
A point of sale system typically consists of the software and hardware required not only to accept payments, but also to manage a business’s general day-to-day sales and processes.
Most point of sale systems will allow you to accept payments, process sales, run reports, track inventory, manage employees, reconcile tips and commissions, and even accept gift cards and set up loyalty programs.
Because point of sale systems usually encompass everything a business needs to manage their sale and payment processes, “merchant services” and “point of sale” are often used synonymously
If you’re accepting in-person payments, at the very least, you’ll need a credit card terminal—that is the physical device that you use to swipe, dip, or tap a credit card. This device will connect to your merchant service provider and will facilitate the process required for you to take, verify, and actually receive a payment. Credit card terminals come in a variety of shapes and sizes-from simple magstripe swipers to handheld terminals.
If your business is accepting online payments, you’ll need to get a payment gateway from a merchant service provider. A payment gateway is a piece of software that works with your website or e-commerce store and allows you to take and process secure credit card payments online.
A merchant services provider is a company that provides a variety of services and products all centered around accepting payments of all types. They set you up with a merchant account, sell terminals, install POS systems, help you fight chargebacks, give you online invoicing capabilities, sales data, and the works. Merchant services providers act as a liaison between your business and the world of payment processing. Ideally, they become your go-to resource for all things payment.
Merchant services are authorized financial services that allow a business to accept credit card, bank debit card or mobile payments; transactions using online ordering or point of sales systems.

